GolfBuddy Knowledgebase
-
GB Course Manager for Windows PC
.
URL : http://help.golfbuddy.com/sList.asp?searchproduct=42&searchcategory=5&seq=1549&page=1&searchtext= -
GB Manager
Please click on the link (in blue) below so that it may direct you to our website.
http://www.golfbuddyglobal.com/
[ INSTRUCTIONS ON HOW TO DOWNLOAD OUR G3 MANAGER PROGRAM ]
** This is the first step to take in order to register your unit **
1. Visit our website at www.golfbuddyglobal.com
2. Go under SUPPORT on the bottom of our website.
3. Please select the DOWNLOADS option.
4. Select the appropriate GolfBuddy Manager program according to the type of computer and unit you have.
5. You should get a small gray window giving you the option to RUN the program; please RUN it.
*Note: If SAVE is the only option you receive then go ahead and save it.
6. Proceed by selecting either RUN, NEXT, ALLOW, YES, or INSTALL, depending of what option appears.
7. When the program is done installing, you should see a small blue icon on your DESKTOP titled G3 MANAGER or GOLFBUDDY WORLD COURSE MANAGER.
8. Go ahead and open the program and enter your user id and password and press login if you already have your unit registered OR press the bottom left button titled SIGN UP to open up a registration form.
*NOTE: The registration form will appear on an internet browser. Please DO NOT use SYMBOLS (including punctuation marks) or CAPITAL LETTERS throughout the entire registration form.
Also, please press the AVAILABILITY blue box right next to the user id, if the user id is available, please press OK.
[ INSTRUCTIONS ON HOW TO UPDATE COURSES ON YOUR UNIT ]
1. Please connect your unit to the computer using a USB data cable.
2. Open the G3 or GolfBuddy World Course Manager program and LOG IN.
3. STEP 1: DEVICE CONNECTION- Please wait until the screen displays that the device is connected. When this happens, please proceed by pressing the blue button titled NEXT at the bottom of the page.
4. STEP 2: FIRMWARE INFORMATION-Please proceed by pressing the blue NEXT button.
5. STEP 3: SELECT COUNTRIES TO UPDATE-Please select the country (or countries) that you would like to update. Once you have made your selection, you can either update the entire country or just a certain state, province, town, etc.
6. Once you have made a selection please proceed by pressing the blue NEXT button.
7. If you receive a small gray box, please make sure that the NEWLY UPDATED ONLY box is checked marked.
8. When finished, you will see UPDATE COMPLETE on the screen and on the top right you will be on the FINISH tab with a blue check mark on it.
9. If you are finished updating courses, please close the program.
10. On the UNIT, please press the EXIT SYNCING MODE message on the bottom of the screen. After the unit restarts you can then safely remove the unit from the computer.
[How to Run an App in Compatibility Mode in Windows 10]
You can go into a app's properties to change its compatibility mode settings. With compatibility mode, you can force an app to use settings from an earlier version of Windows -- helpful if you know the app ran well in, say, Windows 7 or Vista. You can also change the display and color settings for the app.
1. Right-click on an app and select Properties. You can do this from the app's shortcut or by navigating in File Browser to the EXE file for GB Manager.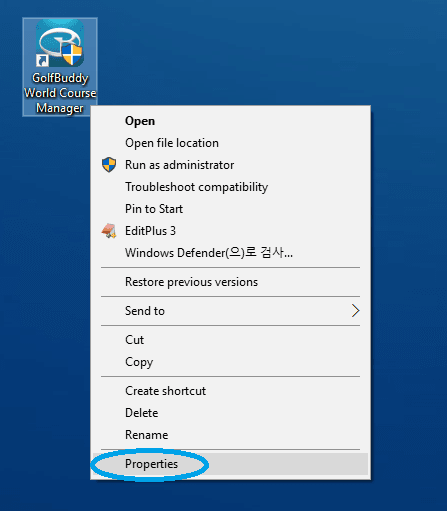
2. Select the Compatibility tab, then check the box next to "Run this program in compatibility mode for:“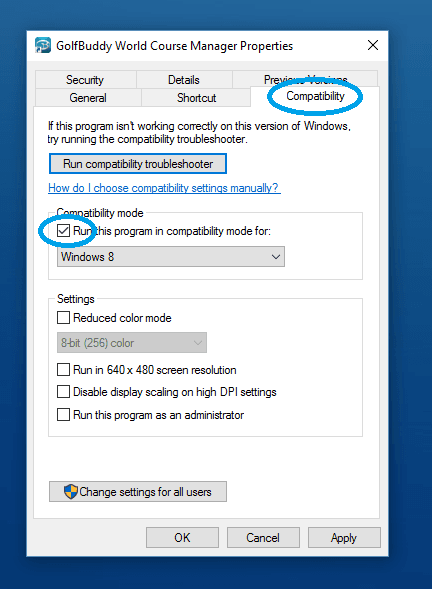
3. Select the version of Windows to use for your app's settings in the dropdown box.
4. Hit Apply, then run your app and see if this fixed your issues.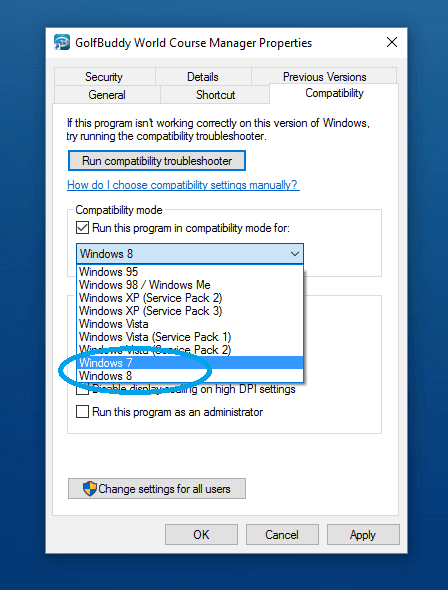
URL : http://help.golfbuddy.com/sList.asp?searchproduct=42&searchcategory=5&seq=1299&page=1&searchtext= -
How to Run an App in Compatibility Mode in Windows 10
[How to Run an App in Compatibility Mode in Windows 10]
You can go into a app's properties to change its compatibility mode settings. With compatibility mode, you can force an app to use settings from an earlier version of Windows -- helpful if you know the app ran well in, say, Windows 7 or Vista. You can also change the display and color settings for the app.
1. Right-click on an app and select Properties. You can do this from the app's shortcut or by navigating in File Browser to the EXE file for GB Manager.
2. Select the Compatibility tab, then check the box next to "Run this program in compatibility mode for:“
3. Select the version of Windows to use for your app's settings in the dropdown box.
4. Hit Apply, then run your app and see if this fixed your issues.
※ If will not fix the “runtime error”, please refer to the link below and try it.
https://appuals.com/microsoft-visual-c-runtime-library-error-windows-10-fix/
URL : http://help.golfbuddy.com/sList.asp?searchproduct=42&searchcategory=5&seq=1623&page=1&searchtext=